Tuesday, December 23, 2014

Blackstrap Molasses Walnut Ice Cream


I think this molasses ice cream recipe by Jeni Britton Bauer of Jeni's Splendid Ice Creams is my new favorite holiday ice cream. I was a little surprised that it could have such a rich taste, since it's not a flavor that at first I thought would stand out as much in comparison to peppermint or chocolate, but there's something about the simplicity but depth of this that makes it really stand out. It kind of tastes like a molasses cookie distilled into ice cream. So if you are looking for a Christmas recipe, consider whipping some of this up! There are so many interesting things I think you could accompany this with: a chocolate-orange sauce or cookie, a glass of egg nog, or a plum or apricot sauce. Or just eat while sitting by your tree.


Hope everyone has a lovely holiday and some delicious meals! :) See you in 2015!

Molasses Walnut Ice Cream
From Jeni Britton Bauer
Makes about one quart
(requires an ice cream maker)

Ice cream: 

2 cups whole milk
1 tablespoon plus 1 teaspoon cornstarch 
1 1/2 ounces (3 tablespoons) cream cheese, softened 
1/4 t fine sea salt
1 1/4 cups heavy cream
1/2 cup sugar
1/4 c blackstrap molasses 

Blackstrap walnuts:

1 cup walnuts,  halved
2 tablespoons light brown sugar
1 tablespoon blackstrap molasses
1 tablespoon honey
1 tablespoon unsalted butter, melted
1/4 teaspoon fine sea salt
1/4 teaspoon ground cinnamon 

1. For the ice cream, mix about two tablespoons of the milk with the cornstarch in a small bowl to make a smooth slurry. Whisk the cream cheese and salt in a medium bowl until smooth. For later, fill a large bowl with ice and water. 

2. Combine the remaining milk, the cream, sugar and molasses in a four-quart saucepan, bring to a rolling boil over medium-high heat, and boil for four minutes (the mixture may appear curdled from the acidic molasses, but it will come back together in the finished ice cream). Remove from the heat, and gradually whisk in the cornstarch slurry. 

3. Bring the mixture back to a boil over medium-high heat and cook, stirring with a heatproof spatula, until slightly thickened, about one minute. Remove from heat. 

4. Gradually whisk the hot milk mixture into the cream cheese until smooth. Pour the mixture into a one-gallon Ziploc freezer bag and submerge the sealed bag in the ice bath. Let stand, adding more ice as necessary, until cold, about 30 minutes. 

5. Meanwhile, for the blackstrap walnuts, preheat the oven to 350 degrees F. Combine the nuts with the remaining ingredients in a bowl, tossing to coat. Spread out on a baking sheet and bake for about eight minutes. Stir, and then bake for another five to six minutes, stirring twice. The nuts should look bubbly and somewhat dry. Remove from the oven and let cool completely, stirring the nuts every couple of minutes to break them up (they'll harden togeter if left sitting for too long). 

6. Pour the ice cream base into the frozen canister of your ice cream maker and spin until thick and creamy. 

7. Pack the ice cream into a storage container, folding in the walnuts as you go. Press a sheet of parchment directly against the surface and seal with an airtight lid. Freeze in the coldest part of your freezer until firm, about four hours. 

Saturday, December 13, 2014

Personality Grid

In my photography class this fall, one of our assignments was to do a "personality grid," a grid of different photos of the same person showing different personalities, while keeping the same basic frame on the person. 

You can tell the weather was a bit warmer when I took these of my friend on her front stoop while we had a glass of wine. We were supposed to use a prop, and I liked the idea of using wine since it's a natural thing for a person to be holding, and makes the result feel like these photos could have happened spur of the moment. In general, I really love the results of this, because it showcases so much more about a person than a single photograph.


If you're interested in doing some similar, you need to take quite a few more pictures that you end up using (I probably had about three times as many as ended up in the final product), and figure out a way to give the person direction on which mood to show. For me, the first part was asking someone who I thought would get a kick out of this, and then named off potential moods for her to personify as I took pictures.

Once I looked back at the photos I took of her, I decided to make this semi-focused on laughter (that counts as a mood, right?), since I had a lot of great ones of her cracking up, and also shows her sense of humor. 

Tuesday, November 25, 2014

Ginger Beer Vodka with Bitters

I love the day or two right before a holiday, when things start to wind down and there's a sense of anticipation about a break. Today was one of those days, which warranted a last-full-day-of-work cocktail tonight.


This is one of those recipes that is derived out of trying to use certain ingredients, with fun results: a friend from work gave me some homemade bitters recently, and I'd been trying to think of something to make with them that wasn't a Manhattan, basically, since I'm not very cocktail literate, and that's the only cocktail recipe I know that has bitters in it! I love ginger beer, and through some searching, found this recipe, which I think is basically a modification on a Moscow Mule.

While not really a seasonal drink, the spiciness of the bitters and tanginess of the ginger give this a really interesting kick, which is balanced out by it also being really refreshing.

Happy Thanksgiving!

Loft a Better Mule (official name)

1 half lemon
1.5 - 2 ounces vodka
4-6 ounces ginger beer
1 ounce ginger liqueur
1 dash bitters
Optional: slice of lemon

Squeeze lemon into a chilled glass. Add vodka, ginger liqueur, and the bitters, and then fill with cold ginger beer. Garnish with slice of lemon (optional). Stir with stirring stick.

Sunday, November 9, 2014

Halloween

Some friends from college were in town last weekend for Halloween, and became Pam from Archer, a witch, a ventriloquist dummy, an Uber kitty, and witch number two. 


Wednesday, October 22, 2014

Columbia Heights Street Photography

I always knew Mount Pleasant/Columbia Heights, where I live in DC, where visually interesting places, but it took a couple of recent photography class assignments to actually get out and see how many compelling compositions, textures, shadows and people there are around me. I spent a couple of recent Saturday afternoons doing some long and rambling photo walks in my neighborhood, and had a ton of fun viewing things through the camera lens. These are some of my favorites, and it's fun to look at them now, because I don't think I would have noticed most of these things without having been looking to capture interesting visual moments. 


This last one is kind of weird, but I kind of like it. The neon noodle sign, the guy with the iPod, and how you can see the row houses leading into the skyline tell a visual story of the neighborhood to me.

Thursday, October 2, 2014

Photo of the Day

I've been doing more photography lately, and thought it could be fun to post more pictures I've taken and think a little about what works or doesn't about them. 

I took this picture after getting off the metro pretty late last Sunday night, and turning around realizing the symmetry of the two escalators was interesting. I was glad to catch a woman wearing a fedora, which I think gives this nighttime, high ISO, black and white shot a mysterious feeling.

DC, Columbia Heights metro. 

Thursday, September 11, 2014

Restaurant Review: Bread Furst


I've been curious to try the bakery and cafe Bread Furst since it opened this spring, especially after hearing that it was being run by DC's "preeminent baker" whose goal is to try and fill some of the void we have in DC in terms of good bakeries. In particular, I've been looking for a place to buy really good bread.


My first impression was that it was as bustling shop that is intentionally trying to not be a coffee shop - they had a sign on the door asking that laptops and cell phones be put away, and is full of lots of fresh and unique offerings. So this isn't a place to come and get work done on your computer. I went on a Saturday morning, and it was very busy, but it didn't take that long to get through the line, and it made the environment more vibrant.


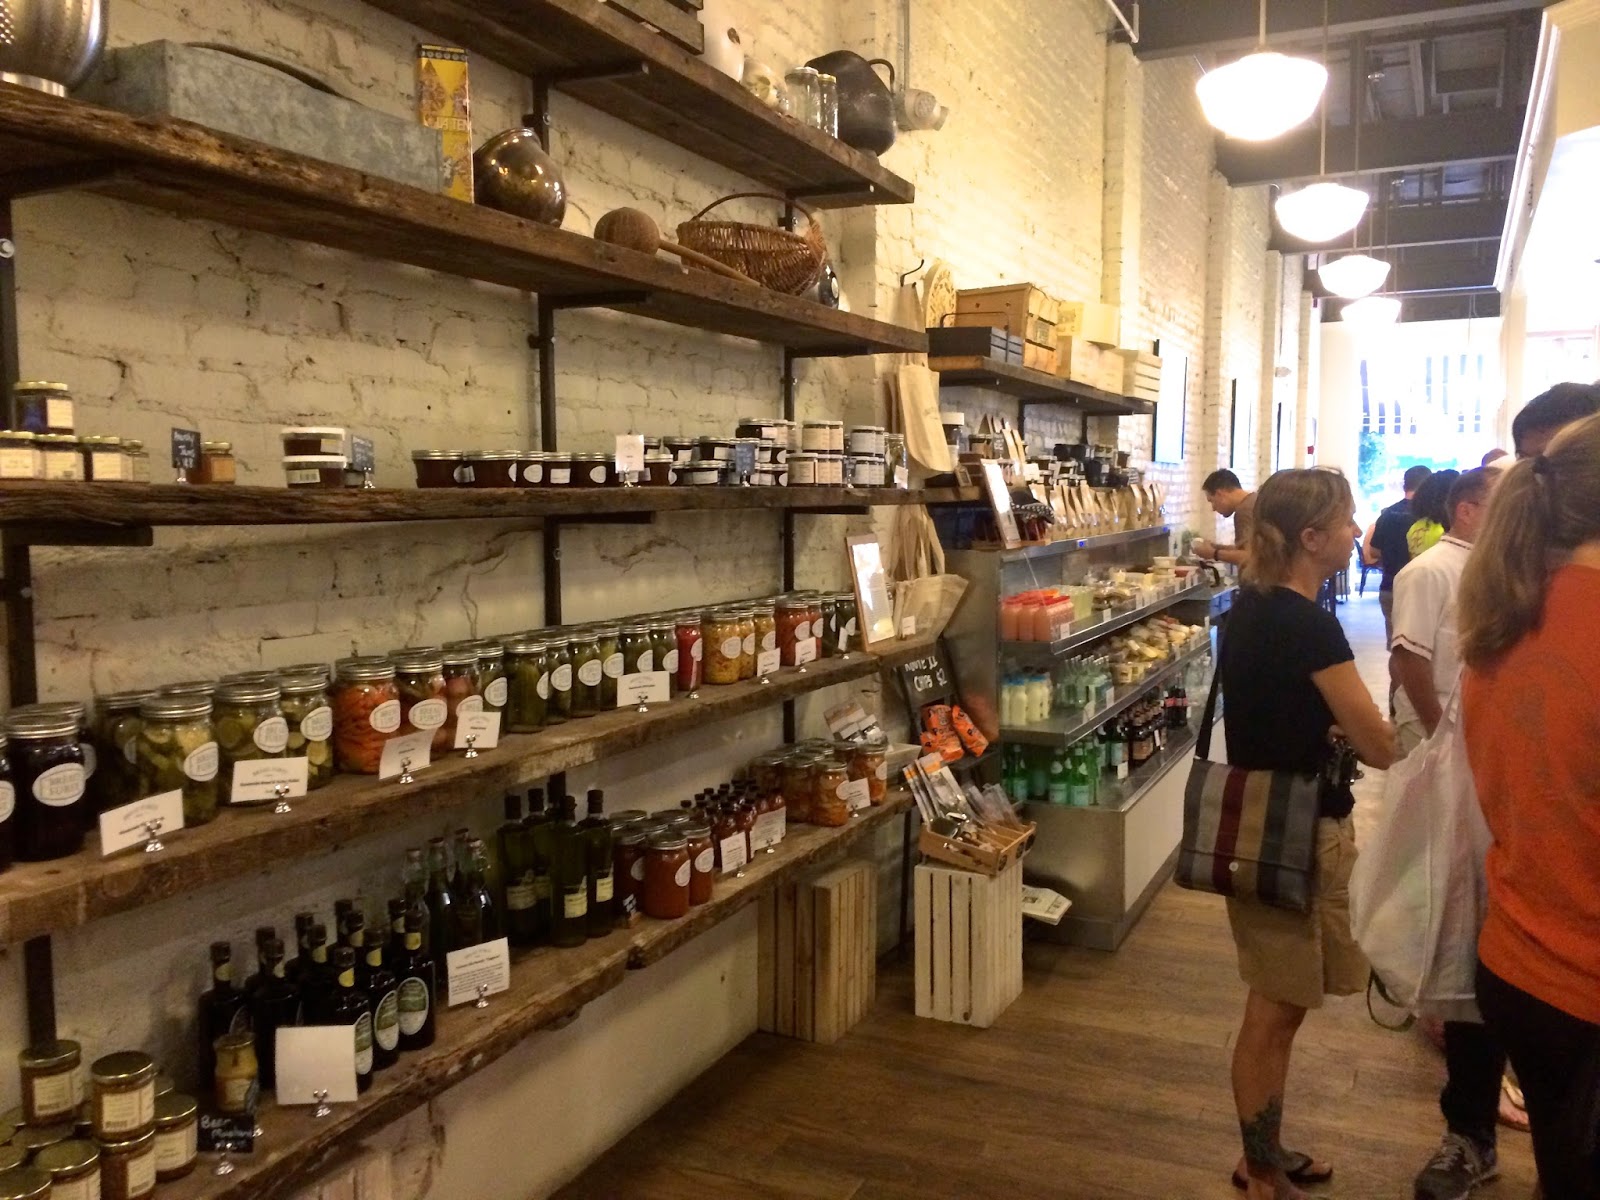
My second impression was that Bread Furst puts a lot of emphasis on being artisanal. In addition to their really impressive array of baked goods, they also have a wall of canned goods, cheeses, olive oil, and probably other things I didn't see.


I bought an incredibly random, but possibly representative, bundle of goods: a loaf of whole wheat bread, a jar of pickled root vegetables, a mini blueberry pie, and a couple of bagels. By far, the loaf of bread was the best: it had great texture that wasn't too dense or too fluffy, and just seemed expertly done. The pickled root vegetables were also pretty great.

I didn't get any of the hot food, but it seemed like a lot of the other customers were picking up one of these menu items as their Saturday-morning brunch (they had bagel sandwiches, an egg sandwich on an English muffin, and vegetable frittata), as well as coffee. 

One of my thoughts was that this would be a really great place to get a gift for a foodie - it would be really fun to try some of their other canned items and cheeses, and since those things were a little pricey, something someone might not buy for themselves. 

The thing I was most curious about when leaving was an intriguing item that was new to me. Conceptually. A tomato bacon jam, with maple syrup and chili powder, which sounds like it would be amazing on an egg sandwich or potatoes. The problem was that it was $22, for a 24-ounce jar... so I think this may go on my list of recipes to try and respectfully imitate.

All in all, I'd love to make this a regular place to buy bread. The only issue is that the location is a bit random, as it's in Van Ness, next to a car wash, so I'll probably just pick up a few loaves when I'm in the area. I really hope this business does well, though, since I think DC needs more artisanal (ugh, sorry for using that word) bakeries, so I encourage you to check it out!

Saturday, March 15, 2014

It's March: Scallops with Avocado and Grapefruit


I'm ready for spring. I think a lot of people are feeling this way right now, after such a long and cold winter in so many places. The winter in DC was definitely better than the one back home in Minnesota, but it was still colder than usual, which meant more chilly walks home from the metro and more cabin fever from things getting closed because of snow. I'm definitely ready for some nicer weather and more light! 

Since it's not quite spring outside yet, I decided to bring some spring to the kitchen. 

I've never cooked scallops before, and have been wanting to try making them myself for a while. This is the perfect recipe to break up any winter-cooking overkill you may be experiencing in the kitchen (anyone tired of soup or lasagna or feeling uninspired at the end of a season?). 

I really liked this recipe because it brings together a lot of different flavors in a very simple way, which makes it taste fresh, and because the combination of tangy grapefruit, buttery scallops, and creamy avocado challenges your taste buds just enough to keep a simple assembly interesting.

Cooking the scallops: As you've probably heard or experienced, the danger with scallops is over cooking them. So watch them carefully. The time it will take to sear them will vary based on their size; the recipe below indicates searing them for about three minutes per side for larger scallops. Reduce that time if you are cooking small or medium-sized ones. Because you are really trying to sear the outside, start with a very hot pan and oil. You should add the scallops once the oil begins to smoke. If the oil starts to fry and bounce on the pan while the scallops are cooking, reduce the heat slightly. 


(You can tell they did not give me evenly-sized scallops at the fish counter, which made cooking them a bit more challenging.)


To segment the grapefruit, cut the top and bottom off, and then slice off the peel. Then, cut away the part that is in between each vertical membrane. With the peel off, it's pretty easy to pull each section out. 


This recipe was originally a salad, with the idea being that you would put all of the these things on mixed greens. To make this a main dish, I didn't use salad greens, but instead put this all over some Israeli couscous. I thought that was a pretty amazing combination, but if you want to make a lighter dish, I think salad greens would be great too. 


Scallops with Avocado and Grapefruit 
Adapted from: http://fiveoclockfood.blogspot.com/2010/06/seared-scallop-salad-with-rube-red.html
Serves 8

Serve over salad greens or couscous.

8 scallops, preferably U10 size, never been frozen (U10 means that less than 10 will equal one pound, so they are larger in size)
1 grapefruit: 1 T juiced, and about 6-8 segments removed
1-2 T olive oil
1 avocado, sliced
salt and fresh ground pepper
olive oil as needed to cook scallops

For dressing:

4 T chopped shallots
3-4 T chopped chives
1.5 T olive oil
2 T fresh-squeezed lemon juice
1 T fresh-squeezed grapefruit juice

1. Segment and juice grapefruit and set aside. Slice avocado and set aside as well.
2. Sprinkle salt and pepper on the scallops. Add olive oil to a medium or large skillet on high heat. Once oil is smoking and pan is very hot, add scallops. Let sear for about three minutes on each side for large scallops, less for small or medium sized ones. Each side should have a golden brown crust. When done, the scallops should still be slightly opaque in the middle when you slice into them.
3. While scallops are cooking, make the dressing. Combine shallots, chives, olive oil, lemon juice, and grapefruit juice in small bowl and stir with a fork.
4. Prepare either salad greens or couscous as your base for the dish.
5. Divide up servings of the couscous or salad greens, and, once scallops are done, place them on top along with a couple of grapefruit segments and avocado slices per serving. Add a couple of spoonfuls of dressing over everything.

Enjoy! And happy almost spring!

Sunday, February 9, 2014

Monster Cookies


My college dining hall used to make these cookies. They always got them perfectly cooked so that they were the perfect softness. I've made these several times since college when I'm feeling nostalgic for the super-satisfying combination of peanut butter, M&Ms, and oatmeal. They are also really easy drop cookies, and are sweet, nutty, and energy-boosting at the same time.

I was trying to think of something to make for having a few people over for the Super Bowl last weekend, and remembered these. They seemed right for the Super Bowl because they seem like something that would be great for after a long workout... or, equally, after watching a bunch of professionals do that. 


Monster Cookies

Makes about three dozen

1/2 C butter
1/2 C peanut butter
2/3 C brown sugar
2/3 C white sugar
2 eggs
1 tsp. baking soda
1 tsp. vanilla
1 1/2 C oatmeal
1 C flour
1 C M&M's

1. Preheat over to 350 degrees.
2. Mix butter, peanut butter, brown sugar, and white sugar.
3. Mix eggs with baking soda and vanilla, then combine with former mixture.
4. Add dry ingredients, and bake 9 to 11 minutes on a greased cookie sheet. ** These are best when they're soft, so don't over bake. Check at 9 minutes and take them out if possible.


Music to cook to #1: 

Joanna Newsom, Does Not Suffice

I rediscovered her 2010 album "Have One on Me" while baking these cookies last weekend, and I'm readdicted to this song now.

Music to cook to #2:

I loved Prince on New Girl on the show that aired right after the Super Bowl! Better than  in the half-time show. He is so intentionally over-the-top but endearing at the same time. A favorite song:

Little Red Corvette